THEbattle axeswere used in the early Middle Ages by Vikings and Slavs much more often than expensive swords. These were weapons that even common people could afford. None of their deadly impact was lost during the early Middle Ages and Renaissance, when axes took the form of all-metal weapons, often decorated with engravings.
Meaning of Viking Axes
During the Viking Age, the ax was essential for everyday activities in Scandinavia. Swords were indeed much more complex and expensive to make, which is why they were often used by nobles or wealthy people. The ax on the contrary is aweapon that is accessibleto anyone, since it is a very widespread tool.
In our time, the ax has become a realsymbol of Nordic culture. Everyone has in mind the image of the Viking fighter, ax andshieldvikings in the hand preparing to go into battle.
Viking axes were often characterized by theblade elongationto provide a longer and more efficient blade. The other type of ax purely for combat is theDanish ax, much longer, it was very often used during battles and terrorized enemies.
Making a Viking Ax
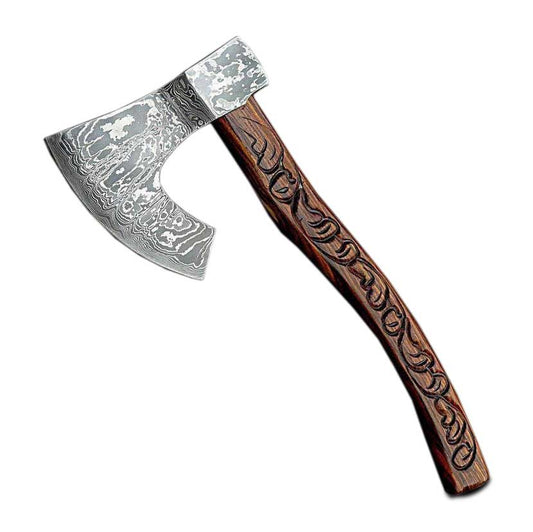
Our axes are made and cut by hand. The blade is laminated and mounted on a slightly curved handle, with a leather protection to ensure a good grip on the handle. This is a one-handed weapon that was probably used in place of the sword, as it is easier to make and more versatile around the camp and in the woods, or as a complement to the spear. The axes are considered "combat ready" and should be handled with extreme caution due to their sharp blade, therefore ideal forcut your woodlike the vikings did hundreds of years ago. They can also be used indecoration.
Blade manufacturing
The first step in making an ax is to chisel a hole in a block ofsoft steellow carbon. Using a mandrel, the eye is stretched to the required size. Next, a notch is chiseled into one end of the billet and a wedge-shaped piece of alloy steel is inserted into it to form the harder cutting edge. The ax is then heated until it turns a dark yellow color, then it is sprinkled with borax. The molten borax liquefies the oxidation deposit and removes it from the weld bead. The ax is heated again, this time to a bright yellow color, and forged so that the two pieces of steel weld together. The blacksmith then forges the head of the ax into shape and grinds the raw edge. The ax is now ready to be fired.
Annealing is necessary to remove internal stresses in the steel formed during forging. To do this, the ax is heated to 850 degrees Celsius and cooled very slowly to room temperature. Then the ax moves to the second stage of heat treatment, normalization.
For this, the ax is heated again, this time to 800 degrees Celsius, our maker's mark is stamped into the steel and the ax is cooled in air. Normalizing prepares the steel structure for the next step: hardening.
Again, the ax is placed in an oven and heated to 800 degrees Celsius. Then the ax is dipped in mineral oil and water. The ax is now quite hard, but it is very fragile and needs to be tempered. For the last time, the ax is heated to 220 degrees Celsius and kept at this temperature for one hour.
Once the ax has been tempered and the steel is hot enough, a mixture of beeswax, linseed oil, and turpentine is applied to the ax head. This is a very old and effective method of protecting the tool from rust. After sharpening and fine polishing the ax blade, it achieves a mirror finish, becomes razor sharp and is ready to receive its unique handle.
Manufacture of the handle
Each ax handle is individually made for each ax head to achieve a perfect fit.
To start, we choose a piece of locally harvested, kiln-dried (6-8% moisture) knotless ash wood, then trace it using a template. We only use wood with grain parallel to the eye of the ax, if the wood grain is perpendicular to the eye of the ax, it will break quickly and not last long.
The raw shape of the handle is sawn using a band saw. Then the handle is shaped using a penknife. The dimensions of the eye of the ax are marked on the top of the handle and the handle is shaved to fit the eye. Final finishing is done using sandpaper to ensure a perfect fit. Then the ax handle is inserted into the ax head and locked with the wooden corner which is glued with epoxy wood glue. A small steel wedge is hammered into the wooden wedge to block the ax head vertically.
Now the ax has been placed in the Tung oil bath for 24 hours, which fills the pores of the wood with the oil and causes the handle to swell. So after a week the oil dries and polymerizes and the wood is fully protected and never shrinks.
The leather sheath
Like our other leather items, the ax sheath is made from leather in a local tannery, using the same methods and techniques as 100 years ago. The 4mm thick leather is dyed with professional oil dye. Then the leather is treated with heated palm leaf wax and beeswax which gives it a vintage look and protects it.
Custom axes
At Ervald, we work withartisansto create ax models, this is why we can offer you customizations.
For example, you canadd an engravingor even request a particular blade design. To do this, contact us via ourContact form.